Showing posts with label Essence. Show all posts

Friday, 29 March 2013

Black Cat Lacquer Lucky Star over Essence Madly Purpled

The second polish I grabbed from the Essence Floral Grunge Collection was Madly Purpled. While the name sounds like something vivid and bold it actually is a muted lilac polish that according the the label on the cap is supposed to be worn matte - now if Essence calls this matte..... oh well, the finish is nice enough:


Isn't this just the most lovely and soft mauve/lilac polish? I cannot believe that this is actually a bargain polish for less than CHF 5.00!!! I applied two coats of Madly Purpled over Essence XXL Nail Thickener and did not apply any top coat. The polish contains tiny shimmer particles that translate to this silky finish as shown above. The formula and application were perfect. The only little issue I have - I don't call this finish matte but rather silky but no complaint here as I like it a lot.

Mei Mei's Signatures (an awesome online polish watering hole by the way, that ships internationally) has launched Black Cat Lacquer some two weeks ago and me being the cat lover that I am of course had to add this brand to my stash.


This is one coat of Black Cat Lacquer Lucky Star. The polish is incredibly glitter dense and especially the smaller and mid sized glitters spread nice and easy. The formula is on the thick side but still not too difficult to apply with the brush. As expected the stars are a bit shy to leave their crib but thanks to the amount of glitter you can easily fish some out. Another great thing is that the stars are not too big, so they lay nice and flat on any of the nails.


The above picture is taken outdoors in the shade - do you see the loads of glitter that spilled out of the bottle? Insane, incredible, in short - WOWZERS!!!
Have you tried any Black Cat Lacquers yet?
I bought Black Cat Lacquer Lucky Star from Mei Mei's Signatures and Essence Madly Purpled with "my" Coop.
I look forward to reading your comments - thanks for visiting!!!
Christine


Monday, 25 March 2013

Wicked Polish Black Lung over Essence Black to the Roots

This week I will show you some new to my stash brands along with some new polishes of Essence and Catrice.


Just last Saturday I found a new Essence Collection displayed at my local Coop called Floral Grunge. While I always give the make-up items a pass (but they do look lovely) I usually pick up  the one or the other nailpolish. I choose two polishes from the Floral Grunge Collection. First up Essence Black to the Roots. A deep charcoal polish with silver glitter that looks most interesting in the bottle. But that's about it color and finish wise.


The application was really great and the consistency is excellent and the brush is very good. I only realized after I came home that the caps are labelled - this one being "the Rough" but I wonder what it means because it really has absolutely nothing to do with any of the textured finishes we've been talking over the last couple of weeks but simply dries to a bumpy finish. AND a lot of the glitter sinks into the polish so there is not much sparkle to see. I added Butter London Hardwear on my middle finger:


Harlow & Co recently launched Wicked Polish in their shop and while at the moment all the buzz is about neon glitters I went for Black Lung (what a HIDEOUS name), a black jelly filled with tiny rainbow glimmer particles and some bigger black hex glitters. Black Lung (ugh I cannot get over this name) would probably require a couple of coats of reach a decent opacity but then I like my blacks to be deep opaque if you know what I mean.


Indoors in daylight the sparkle keeps pretty much hidden but there is a shimmer in Black Lung that gives the polish a blue tinge - very edgy I find.


In artificial light the sparkles really light up and twinkle beautifully.

The consistency is thin but not runny and distributes nice and evenly on the nail. I applied two coats over Essence Black to the Roots. I used Essence XXL Nail Thickener as Base Coat and Essence Better Than Gel Nails Top Sealer as Top Coat.


Final thoughts: I really love Wicked Polish Black Lung and find it an edgy cool change to all the pastels we have seen in the Spring Collections.

I ordered Wicked Polish Black Lung with Harlow & Co and I bought Essence Black to the Roots with the local Coop.

I look forward to reading your comments - thanks for reading!!!
Christine

Wednesday, 6 February 2013

Essie Jelly Apple


This post is for Radha from The Polish Owl who has sent me a gorgeous nailmail some weeks back. She added a longtime Essie lemming of mine to the package. Please meet Essie Jelly Apple:


Isn't this a super happy squishy polish? And this is one unbelievable coat of Essie Jelly Apple over Butter London Nailfoundation. If I would wear it on its own, I certainly would apply a second but I had  some plans with it: last week I picked up all glitters from the Essence Hugs&Kisses Valentine Collection. There are four glitters along with cream base colors. I left the creams behind (as if I need another lilac or red cream ;-) and took the glitters with me. The first I wanted to use and the one that I liked most is Sunshine and Red Roses. I expected some wrestling with the heart shaped glitters but much to my surprise they nearly hopped on to the brush.


The formula of Essence Sunshine and Red Roses was absolutely easy, the consistency is whether gooey nor thick, a real surprise for a polish that retails for CHF 2.95!!! The base color of Sunshine and Red Roses is ever so slightly tinted red so I have no idea what it would look on a different base color. I hope I have some time soon for experimenting though ;-)

Final thoughts: I LOVE  Essie Jelly Apple and am soooo happy to have been able to include it into my polish family. I am also very pleased with Essence Sunshine and Red Roses and will do some more brain racking in coming up with base colors that would show more of the red and holo glitter - but then maybe its just a dose of sunshine that is missing here ;-)!!!

I look forward to reading your comments - thanks for visiting!!!
Christine


Saturday, 5 January 2013

KBShimmer Sugar Plum Fairy


This post is devoted to my dear friend Radha from the Polish Owl. It was her who introduced me to KBShimmer and was so to say with my by Twitter when I received my first ever bottle of KBShimmer. When the two of us discussed the KBShimmer Christmas Collection in December she assured me that I would need Sugar Plum Fairy. After waiting now for weeks (winky winky to our postal service) I finally could unpack it yesterday! So it is only fair to say: this post would have never happened without you Radha - thanks for convincing me xxx!!!

I tried to apply it on its own but it was too sheer for my taste. I choose Essence Break Through as base color.


I applied one coat of KBShimmer Sugar Plum Fairy over one coat of Essence Break Through. I used Essie Fill the Gap Base Coat and Butter London Hardwear Top Coat (two coats).


In the below picture you see three coats of KBShimmer Sugar Plum Fairy on its own on my ring finger.   Can you see its sheerness?  But this photo shows how close Essence Break Through is to KB Shimmer Sugar Plum Fairy's base color.


Sugar Plum Fairy is so densely packed with glitter and those glitters spread so effortlessly on your nails that I got away with applying one coat only - this means this bottle will last longer for MOI!!!!


What can I say? I am smitten ;-)

Let's see what it looks like when layered over some other purples. From left: China Glaze Spontaneous, RBL Mismas, Opi Honk if you Love Opi


Pinkie: original combo with Essence Break Through as base. 
Ring: China Glaze Spontaneous
Middle: RBL Mismas
Index: Opi Honk if you love Opi. 
I added one coat of KBShimmer Sugar Plum Fairy over each of the above base colors. Please apologize my messy clean-up on my middle finger, only realized now :-( .

This question is easy for me: which one is your favorite layering? Is the answer as easy?

I buy my KBShimmers from Harlow & Co.

I look forward to reading your comments - thanks for visiting!!!
Christine

Monday, 24 December 2012

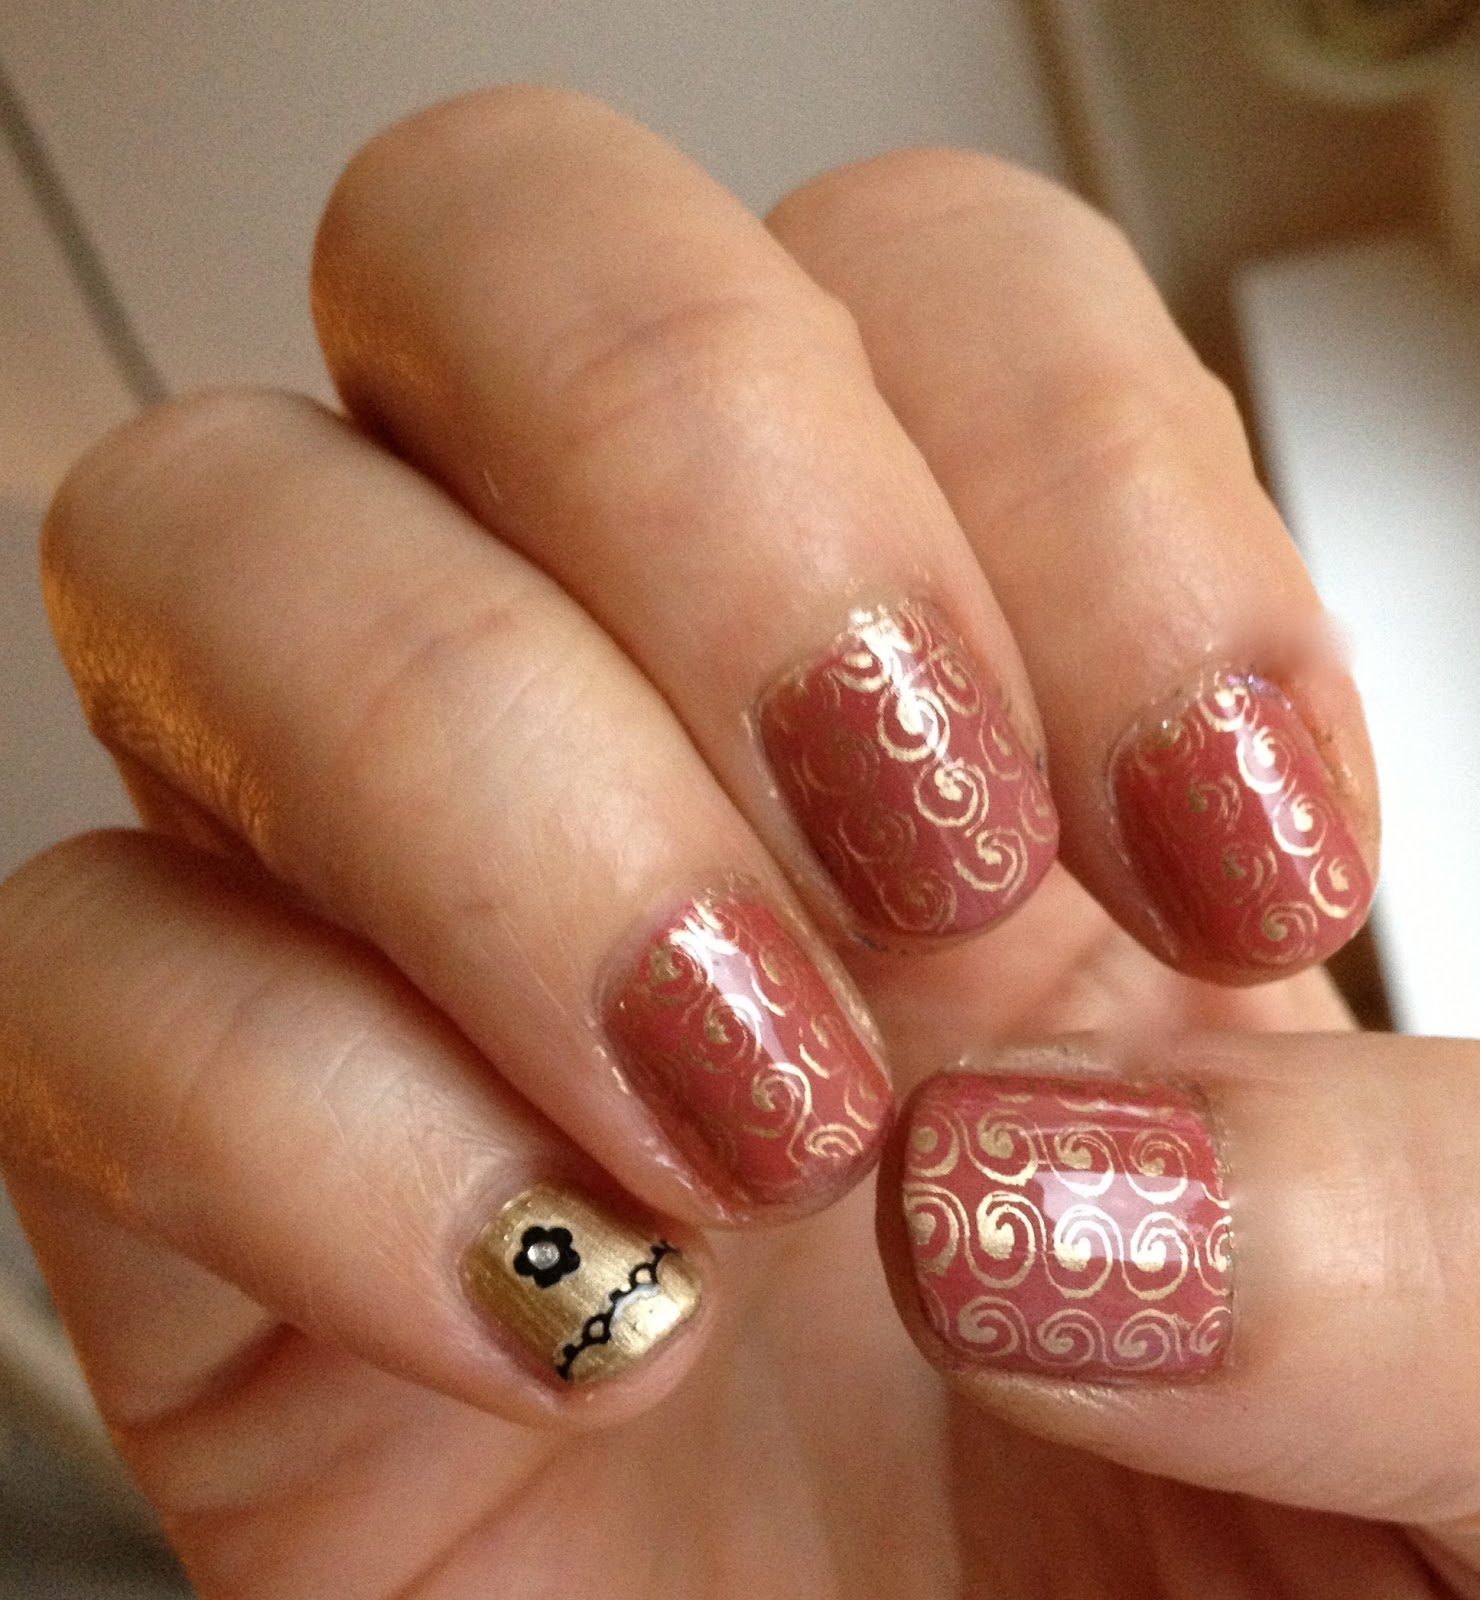
My very first (presentable) stamping manicure


First of all: Merry Christmas to all of you and your loved ones!!! In Switzerland we celebrate Christmas Eve. My hubby and I will go out for an exquisite gourmet dinner with some friends - we do this since many years and it became a beloved tradition.

A couple of weeks back my wonderful sister of polish from Brazil sent two huge stamping plates my way. She probably got tired of me gushing over her beautifully stamped nails and whining over my inability to get any decent stamp on my nails - LOL!!! I had bought a tiny whiny plate from Essence along with equally minuscule stamp and scrapper and did not achieve anything but smears :-S

While everybody claims this to be a piece of cake and the quickest way to do nailart it actually DOES require some elbow grease to learn the trick. It is about using the right polish to stamp, to hold the scrapper at the right angle to move it over the pattern and lastly to take-up and apply the pattern in a soft , smooth roll. Just to tell you as much: it took me a fair bit of practise and questions to other Bloggers to achieve below result and yet I have miles to go to get anywhere near moderate perfection!!! In case you never tried, don't shy away just because of my ranting - it is not rocket-science and please consider I am not really gifted in any crafts involving my hands ;-)

This was supposed to become a skittlette. Oh man, I screwed up properly in my choice of colors and textures. It never looked anything beyond weird. I started saving the mani by simply adding a second stamped nail, well from there you can guess....


both photos taken in daylight

I used Essence Antique Pink from their most recent Vintage District Collection as Base Color and Maybelline Forever Strong in gold metallic for stamping. I left my pinkie as it was from my excursion on skittlette territory because the nail is very small and when having nubs it is minuscule.

indoors in artificial light (sorry for the spot on my index - bad cut from our office move :-( )


Final thoughts: having decent equipment is the starting point. Getting low quality products does not help to motivate practising. So a BIG thank you to my beloved friend in Brazil to have sent those plates my way and persisted in me trying and her patience (along with Nati from the Polish Polygot) to answer all my questions - "grand bisou" for the two of you <3.

What was your first experience with stamping? What are your plans for Christmas Eve?

I look forward to reading your comments - thanks for visiting!!!
Christine

Wednesday, 14 November 2012

NYC Mint Macaroon

My lovely Dutch Instagram friend sent me some really, really pretty polishes some weeks ago.

I have already shown you NYC Fine Red Wine in one of my weekly summaries. The next polish I wore is NYC Mint Macaroon.  This is such a lovely colour, even my boyfriend commented on it and he became quite indifferent to what I slap onto my nails. Not in a bad way - mind you - it's more he cannot keep up at the speed by which me changing my manis ;-).


Isn't this a lovely macaroon? ;-)


Application was easy as a breeze. The first coat went on a bit streaky but the second coat solved it nice and fine. These are two coats over Essence XXL Nail Thickener. It dries fast and to a nice shiny finish.

When I was in town last week I picked up some polishes for my wonderful sister in polish in Brazil. I could not resist to pick up two of them for myself too. Essence Mrs and Mr Glitter are big glitters in a completely, totally clear base!!! That's just bloody awesome since it does not alter any base colour you decide to slap it on - look:


Doesn't this look fun and pretty? I deliberately left the glitter on my pinkie and on my index as it came out of the bottle to show you how badly dabbing is needed with this one. You have to act mighty fast as it dries quickly. The easiest to add some more glitter is to fish some with a tooth pick out of the bottle and place it wherever you want to have it. Due to the tacky base you cannot really separate clusters (pinkie) or move them to bald spots on the nail (index).

Have you bought any of the Essence Glitter recently? If so - which ones? How do you fish for glitter in the bottle?

I got NYC Mint Macaroon as a gift and bought Essence Mrs and Mr Glitter at a local retailer. All photos were taken indoors in artificial light.

I look forward to reading your comments!!!

Thanks for reading!!
Christine

Thursday, 1 November 2012

Essence I Love Bad Boys

Along with Essence Let's Get Lost I picked up a whole bunch of other Essence polishes - there new bottles along with their low prices make it hard to restrain to one or two colours ;-)))

Essence I Love Bad Boys is such a lovely soft blue with all this visible micro shimmer in it - actually it is as visible on the nail as in the bottle - a total win, I would say:

Both photos taken indoors in artificial light (hence the pinkish glow of my skin - sorry):

See how the glitter in the bottle and the nail are visible?

The formula of I Love Bad Boys was a bit thin. The polish also has a tendency to pool along the lines and is not really self levelling. Dry time was not super fast but ok. I applied 2 coats of Essence I Love Bad Boys over China Glaze Ridge Filler Base Coat.

I bought Essence I Love Bad Boys in my local super market.

Do you also fancy soft micro glitter in your polishes? 

I look forward to reading your comments!!!

Thanks for reading!!
Christine

Tuesday, 30 October 2012

Essence Let's Get Lost

First and foremost, I hope all my dear friends at the East Coast are safe and well. My thoughts are with you and your families!!!

OK - this is not about a newly released polish, much less fitting the sluggish November weather in Switzerland, but I am always in if it is about wearing a bright, happy blueish, turquoise colour on my nails:


Isn't this just lovely? So happy and fresh. This is nearly a one coater - I applied two coats out of habit and to cover any possible bald spots. The formula is perfect, easy to manage, self levelling and along with the new brush a breeze to apply. Another bonus: it dries within the blink of an eye, so another last minute option ;-). I used China Glaze Ridge Filler as Base Coat and no Top Coat.

I bought Essence Let's Get Lost at my local supermarket.

Did you pick-up any of the Essence polishes since they revamped their bottles? Do you like to wear bright colours year around as well?

Looking forward to reading your comments!!!

Thanks for reading!!
Christine